Last Minute Mason Jar Gifts

I’m sure most of us have experienced the panic that follows one of our dear children (or spouse) “remembering” at the last minute that they need a secret santa or teacher gift for the next morning. At my house this normally happened about the same time that I put on my comfy clothes and sat down for the evening. I’ve got a fun solution for you that your kids can help with this weekend instead of waiting for the last minute. You can even use these cute jars as decoration until they are needed for gift giving!

Supplies:
Mason jars or any clear jar with a lid – I used pint jars
Various candy
Ribbon or ric/rac scraps
Buttons
Pipe cleaners
Hot glue gun

img_3340.jpg   img_3342.jpg

I chose my candy colors to match the character that I planned to decorate the jar, so brown for the reindeer, red for santa, white for snowman and green for the elf.

Fill each jar with candy before you decorate them.

img_3341.jpg

Next choose a jar and start decorating.

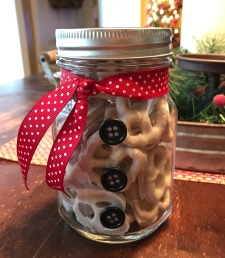
For the snowman I added three black buttons a ribbon scarf.
img_3349.jpg

The reindeer got a red nose and pipe cleaner antlers.
img_3344.jpg

To make santa I added a shiny buckle and red ribbon for a belt and ric/rac around the neck.
IMG_3345  IMG_3347  IMG_3351

The elf also got a shiny buckle with green ribbon and red fringe around the neck.
IMG_3350

You can gift these individually or as a set!

img_3363-e1511716321985.jpg


Freezer Apple Filling

Fall is almost here in my part of the world (mid-Michigan) and along with that comes the onslaught of pumpkin everything, which I love, but another one of my favorite things about fall is fresh apples right from the orchard.  Just the thought of biting into a crisp, juicy apple makes my mouth water!  Several years ago I was overly ambitious and bought a couple of bushel baskets of apples at our local farmer’s market.  I figured I would can homemade applesauce, make a few pies, apple crisp, caramel apples for the kids, etc.  Well, I did make the applesauce and some apple crisp and the kids enjoyed caramel apples, but I still had a bunch of apples left.  I didn’t want them to go to waste and figured that as much as my family enjoyed apple desserts that maybe I would try to freeze some apples, like I did other fruits, to use throughout the winter.  This was before Pinterest was a big thing, so I didn’t really have anywhere to go to search for a recipe or how-to.  I just went for it, figuring the worst thing that could happen would be that I would end up throwing out the apples if they didn’t freeze well.   Since my family loves apple crisp and it is usually pretty quick to throw together if you don’t have to peel, core and slice the apples, I started out with the apple filling for my apple crisp recipe.

Freezer Apple Filling

6 cups of apples, peeled/cored/sliced
1 cup sugar
1/4 teaspoon salt
2 teaspoon cinnamon
2 Tablespoons flour
2 Tablespoons water

Peel, core and slice your apples.  If you have an apple peeler/corer/slicer this is a super quick and easy job and your kids will want to help (bonus!).

After the apples are peeled/cored/sliced, cut the apple into quarters.

Toss the apples into a bowl and mix in the remaining ingredients, stirring until well mixed and all the apples are covered.

Scoop the mixture into freezer bags, squeeze out any air that you can and lay flat.  They are ready to throw into the freezer!

When want to use your frozen apple filling, simply thaw in the fridge overnight or on the counter for an hour or so before baking.  Top with a crumble topping for apple crisp or throw it in a pie crust for apple pie.  The apple filling will last at least six months in the freezer – if your family doesn’t eat it all before then!

This quick and easy freezer recipe is a great way to make fresh fall apples last all year long!

Summer Strawberry Pie

Today I’m sharing a recipe that up until now I’ve only shared with family.  I’ll give you the quick version of the backstory on it.  My husband grew up with an older couple living next door.  They were the kind of neighbors that shared an egg or a cup of sugar when you ran out and they didn’t expect anything in return.  Early in our marriage I was looking for recipes at my in-laws one day and came across this strawberry pie recipe from the neighbor.  I paired it with my hubby’s grandma’s famous crust recipe and it quickly became a family favorite.  Now, during strawberry season, it is not unusual for me to make 5 or 6 pies just to have enough to go around.  I’ve tweaked the recipe a little bit from the original, but I still think of that neighbor lady every time I make this recipe.

Strawberry Pie:

One pie crust (baked according to directions)
5 cups of strawberries
1 cup sugar
1 1/2 cups water (divided)
3 ounce box of strawberry Jello
2 Tablespoons of cornstarch

The first step is to bake your crust.  If you are not a baker or don’t have time to make a crust from scratch, just go to the store and buy a refrigerated pie crust to bake.  I promise your pie will still turn out delicious!  Bake your crust according to the directions and then set aside to cool.

thumb_IMG_2111_1024

While your crust is baking, combine the sugar and 1 cup of the water in a small saucepan and bring to a boil.   Mix 1/2 cup water and 2 Tablespoons of cornstarch together and add to the saucepan once the sugar/water mixture comes to a boil.    Reduce heat and boil gently for 5 minutes while stirring.  The mixture will thicken slightly and become more clear.

thumb_IMG_2113_1024

After 5 minutes remove from the heat and stir in the powdered jello mix.  Stir until mixed well and pour into a bowl to allow it to cool.  You can set this in the refrigerator to cool a little faster if you need to.

Wash and slice your strawberries while the crust and gel are cooling.  I usually halve or quarter the berries depending on how big they are.  This pie tastes the best with in-season, ripe strawberries!  Measure out 5 cups of berries once they are cleaned and cut up.

After the crust and gel have cooled, fold the gel mixture into the cut berries until all berries are covered.

thumb_IMG_2119_1024

Pour the mixture into your pie shell and refrigerate until set.  It is best to let this sit overnight, but if you just can’t wait, a couple of hours in the fridge will set it up enough to enjoy.

1011772_10201033050484093_1978020075_n

I normally only make strawberry pies when berries are in season here in Michigan, so they are a special treat!  Since it’s almost strawberry season, I thought I would finally share my recipe.  I hope you enjoy it!  Happy baking!

DIY String Art

One of the most popular DIY craft projects right now is string art.  It seems like every craft store has kits for sale.  I’ve had my eye on a kit from my local craft supply store for a while, but finally decided to buy the supplies instead of a kit and make it my own.

Here’s what you’ll need:

  • Embroidery floss (or thick string)
  • mini nails (I used 1/2 inch)
  • piece of wood or pallet sign
  • paint (optional)
  • hammer and needle nose pliers
  • paper template (your chosen pattern)

This would be a fun project to do with your kids over spring break!  Each child could do their own initial to make a personalized wall hanging for their room.   Just a tip when choosing your pattern – the wider the template the easier to fill in.  A shape like a block letter, heart or flower will be easier than a script letter or something with curvy edges like a state outline.  If you search “string art templates” on Pinterest you’ll find tons of ideas!

If you want the background of your sign or piece of wood painted that should be your first step.  Since I wanted to use white string for my design I painted my pallet sign with turquoise chalk paint.

Lay your template out on the wood/pallet sign and center it.  If you are doing this project with your kids you may want to put a few pieces of tape on the template to hold it in place. img_1699

Now you can start hammering the nails around the outline.  I found that holding the nail with needle nose pliers is easier on your fingers!   You want to leave about half the nail sticking out so that your string art stands out from the background.

Continue nailing about every 1/2″ all the way around your template.  I didn’t measure and I know that mine are not all perfect, but you really can’t tell in the finished product.

Once you have nails all around the templet you can tear the paper away.  You might end up with a few small pieces of paper that stuck under the nails, these came out quickly with a pair of tweezers.

Now you are ready to start stringing.  Choose where you want to start and you need to tie a good knot in the string around a nail.  Don’t cut the excess off until you wind the string around a couple more nails to make sure your knot it tight enough.


Begin filling in your outline by stretching the string across to another nail and wind it once around that nail.  Continue back and forth in a random pattern until you are happy with how the design is filling in.

Once you have the inside of your design filled in go around each nail on the outside edge to create an outline for the shape.

After you outline the entire shape tie off the string with a tight knot, cut off the excess and you are ready to hang your creation!

img_1715

Wood Slice Ornaments

I love making ornaments and other Christmas decorations for our home, but as the holidays approach, it seems like time is a precious commodity and there are never enough hours in the day. I have been thinking about decorating our house in a few weeks I wanted to add a little something extra to our tree, so I whipped up these cute ornaments in less than an hour!

Here’s what you need:

  • Wood slices (I purchased mine from a local craft store)
  • Stamp – I chose a snowflake, but you could do an initial or anything that fits with your theme
  • Black ink stamp pad – I originally wanted to try gold, but it did not show up well on the wood slice
  • Small screw eyes
  • Jute twine (or thin ribbon)

I started with the wood slices that I purchased at Hobby Lobby. The week I went they were 50% off – bonus! I bought medium size, so the wood slices range from about 3/4″ to 2″ in diameter, but the majority of them are about 1.5″.

This year I am decorating our tree exclusively with ornaments that are handmade by my aunt. Every year she makes each of her nieces and nephews and their children an ornament, so I have an awesome assortment of beautiful handmade ornaments! Most of these have a snowman theme, which is why I chose the snowflake stamp for my wood slices.

I laid out all of my wood slices, stamped one side, flipped them, and stamped the other side. I really like stamping these because it gives them the look of wood-burning without all of the effort!

Next you want to attach the screw eyes. To do this I made a starter hole in the top of each wood slice with a hammer and small finish nail. I pounded it in just far enough to have a small hole to start the screw. It was easy to screw in by hand after that.

Once you have all of the screw eyes attached you just need to add your jute twine or ribbon as a hanger and you are ready to decorate!

This project took less than an hour from start to finish and I’m really happy with the end result.

These would also make great gift topper when wrapping presents or something that the kids could make as a gift for grandma. The possibilities are endless!


DIY Canvas Photos

I don’t know about you, but I love the canvas wrap photos that are very popular right now.  I’ve never ordered one because they can be pretty pricey even with a discount code or coupon!  A few years ago when we repainted our living room I wanted to display a really beautiful sunset photo that I had taken at one of our favorite lighthouses on Lake Michigan.  I wanted it to be fairly large so that it didn’t get lost on the wall, but I also didn’t want to spend a fortune, so I set out to make my own canvas photo.  Since then I’ve made several more to give as gifts or to hang in different rooms of our house.  They hold up very well!  On our most recent vacation I took a photo of a Lake Michigan sunset on a windy night after a very stormy day.  When I look at it I am reminded of the beauty that can come out of a storm.

For this project you will need:
A photo (size of your choice)
A canvas the same size as your photo
black or dark brown craft paint
foam paint brush
Mod-Podge (matte or satin)

  1. Choose your photo and have it printed.  Depending on where you have your photo printed, if you have a print made larger than 8×10 you may have to trim the white around the edges.  I had a 16×20 printed at Sam’s Club, so I had to trim about 1/8″ from each side of the photo.

2016-08-28-11-11-19

2.  Paint the outside edges and a little over the front side of the canvas.  This will take a couple of coats to cover well.  Let the paint dry thoroughly before you move to the next step.

2016-09-11-11-02-53 2016-09-11-11-06-26 2016-09-11-11-08-29

3. Once the painted edges are completely dry, cover the canvas with Mod Podge.  You want to spread quickly as the Mod Podge starts to dry as you spread it.

2016-09-12-16-56-34 2016-09-12-16-57-25

4.  After the canvas is completely covered center your photo on the canvas and press down from the center toward the outside to remove any air bubbles.  Once it is smooth I also run my finger around the entire edge just to make sure the edges are all stuck down.  Let this sit and dry for 20-30 minutes.

2016-09-12-16-58-31   2016-09-12-16-59-42

5.  Dip your brush in the Mod Podge and brush it over the top of the entire photo making sure you go over the edges of the photo.  Don’t panic, your photo will turn white to begin with, but it will be okay, I promise!  Let this coat dry and then do 1-2 more coats letting it dry for at least 30 minutes in between each coat.

2016-09-12-17-01-28 2016-09-12-17-03-07

6.  Once it is completely dry you have a beautiful canvas photo to display or give as a gift!

img_4390

Versatile Bundt Cake

I’ve always loved bundt cakes!  They look like you went to a lot of trouble, but they really aren’t any more difficult than a regular, old 9×13 cake.  I’ve made this cake recipe many times and love trying out different flavor combinations, but I always come back to the Death by Chocolate combo.


Death by Chocolate Bundt CakeIMG_9834

1 box dark chocolate cake mix
1 small box instant chocolate pudding
4 eggs
1 cup sour cream
1/2 cup oil
1 tsp. vanilla
1 cup dark chocolate chips

Preheat oven to 350 degrees.  Add everything but the chocolate chips to your mixing bowl and mix on medium speed for 3 minutes.  Fold in chocolate chips.  The batter will be thick.  Pour into greased bundt pan.

Bake for 45-50 minutes or until toothpick comes out clean.  Cool for 10 minutes in pan and then turn onto cooling rack to cool completely.

This cake is so moist that it doesn’t even need frosting!  I just dust it with a little powdered sugar (mostly for looks) and then serve.


Here are some other great flavor combination ideas, but the possibilities are endless!

Cake Mix

Pudding

Chips/Fruit

Marble Vanilla Chocolate
Lemon Lemon White Chocolate
Spice Pumpkin Spice —-
Chocolate Chocolate Peanut Butter
White Pistachio White Chocolate
Yellow Butterscotch Butterscotch
Chocolate Coconut Cream Toasted Coconut
Strawberry White Chocolate White Chocolate
Devil’s Food Chocolate Maraschino Cherries
Spice Banana Cream Chopped Walnuts
White Cheesecake Fresh blueberries
Orange Vanilla White Chocolate

Happy baking!

No-Sew Window Valance

Do you have a room that needs a quick update or a window that you’ve been putting off finding a curtain valance for?  My kitchen window treatment was in need of an update.  The valance on it was too long for the window and because it was dark brown it blocked quite a bit of light coming in.

Before:  before

I decided to put some of my fabric stash to good use and make a window treatment that fit better with the style in my kitchen.  My window is about 36″ wide, so you will need to adjust the amounts needed by the width of your window, but this should give you some idea.  You can get small pieces of fabric called a Fat Quarter that is 18″ x 21″ at most fabric or hobby stores.  I used 7 fat quarters for this project.   Choose several coordinating colors or go bright & bold and really mix it up!

Cut your fat quarters into 2″ strips.  If you cut along the 18″ side you will end up with 9 pieces that are 2″ x 21″ out of each fat quarter.
2016-05-15 15.22.31      2016-05-15 15.23.20

Before you start tying the strips onto the curtain rod you will want to put the curtain rod back up on the brackets to measure the correct width.  I wrapped a piece of clear packing tape over the center section where it expands so that once I started tying fabric on it didn’t move around.
2016-05-15 15.26.29

You can throw caution to the wind and make this a totally random pattern or divide out all of your fabric strips equally and go in order.  Once you figure that out you’re ready to start!

Take your first strip of fabric, fold it in half and slide the folded end under the curtain rod.  Then take the two loose ends and flip the over the top of the curtain rod and through the fold.  Pull to tighten and you have your first strip done!
2016-05-15 15.32.02      2016-05-15 15.32.25

Keep adding strips and sliding them together on your curtain rod.
2016-05-15 15.35.42 2016-05-15 15.35.55 2016-05-15 15.34.12

Once you reach the end of the curtain rod you are done – it’s that easy!  This type of valance would be perfect for your kitchen, laundry room, nursery or kid’s room!

After:    2016-05-15 16.12.37 HDR-2

10 Minute Spring Wreath

Spring has sprung a little early here in Michigan and hopefully it’s here to stay!  Nothing says “Spring” to me like a bright cheery wreath on my front door, so today I’ll walk you through a quick tutorial to bring a pop of spring color to your front door too!

You will need a grapevine wreath, one large stem of flowers (my photo shows two, but I only ended up using one) and some wire cutters.  The ribbon is optional.  My total cost for this wreath was under $10.


Start by cutting the flowers off the large stem with the wire cutters.  Some of these were quite long and I actually cut them in half to get two stems out of one.  I ended up with about 14 flower stems to use.

2016-03-12 20.11.34


Next, you can just start tucking stems into the grapevine wreath.  If your wreath will be outside unprotected where you get quite a bit of wind you may want to put a dot of hot glue where you tuck each one in, but this is not necessary for most of us.   I started with four stems and equally spaced them around the wreath.

Now just continue around the wreath filling in with flower stems until your wreath is full.


At this point you can hang your finished wreath on the door and admire your beautiful work!

2016-03-12 20.20.20


I had some extra yellow burlap ribbon from a previous project, so I decided to add a ribbon hanger to my wreath.  I cut a piece about 20″ long,  wrapped it around the wreath  and tied a knot at the top.  If your ribbon is narrow you don’t need as long of a piece, but this ribbon is about 5″ wide, so it took a little more to tie it.


That’s it – you’re done!  I just love how bright and cheery it makes my front door!

2016-03-13 11.28.46

30-Day Declutter Challenge

It’s the middle of January and by now you’ve probably broken one or two of your resolutions for the year or maybe you’ve ditched them all!  I’m not really one of those people that makes a long list of resolutions every year on January 1, but I did make a goal this year to get a grip on clutter in my home and keep things organized.  I am normally a very organized person, but my oldest is getting married this year and my youngest is graduating from high school, so I feel like my brain is being pulled in 50 different directions all at once.

I found this great printable list with check-boxes (yah!!) Checking things off a list is fun!

30-day declutter challenge list

The part I like the best about this list is that you can start any time.  You don’t have to wait for the first of the month or join a Facebook group with others and then feel bad when you fall behind because, well, life happens!  So, print it off and hang it on the fridge or put it on a clipboard and then get to work.  I may not declutter one area every day, but some of them are quick and easy enough to do a couple in a day.

Another great idea while you declutter is to have a “donation” box or bin so that when you come across something that is too nice to throw out, but that you don’t have a use for any more, you can make a donation to your local thrift store.

A few good questions to ask yourself while you declutter:
1.  How long has it been since I used this item?
2.  Do I like it?
3.  Does it work properly?  Is it broken?
4.  Do I have more?  If so, how many do I need?
5.  If I keep this what will I get rid of to make room for it?
6.  Can I locate this information elsewhere?  (Probably on the internet)

Happy Decluttering!

clutter-clipart-clutter-u296